The beginner method to solve a 4x4 is called reduction. The concept is that you reduce the cube to a 3x3. There are three big parts to solving a 4x4 cube with this method namely:
- Solve the Centers
- Pair the Edges
- Solve 3x3 Stage (with possible parity)
PART1: Solve the CENTERS
The first part is to solve the six centers. The centers of a 4x4 is not fixed. It is necessary to solve the centers into the correct position relative to each other.
This tutorial will solve the six centers of a 4x4 in the following order:
1. White
2. Yellow (Opposite White)
3. Green (In between White and Yellow)
4. Orange (Next to Green in the front face with Yellow on the left and White on the right)
5. Solve Red (opposite Orange) and Blue (opposite Green) together.
IMPORTANT: This step is generally done intuitively. The concept explained in this 4x4 tutorial is to make a "bar" (2 centers pieces together) and then put the bars together to form a center.
1. Solve the White Center
- Find two white center pieces. In the image below they are on adjacent sides, but sometimes the two pieces may be on opposite sides of the cube.
- Turn the outer layers until the two white centers will come together and form a “bar” when you move the inner layers together. You may need to turn the outer layers 1,2 or 3 times depending on where the white center is located.

- Turn your cube so that the White “bar” is on top. Make the second White bar and put it together with the first.

- If you have a center piece at the bottom then use the steps below to make the second White bar and put it together with the first.

-
If you have 3 center pieces together then use the steps below to put the last center piece in place.

This process is intuitive; you can do it for sure, but it takes a little practice.
2. Solve the Yellow Center opposite White.
- Hold the cube so that the White center is at the bottom.
- Use the 2 inner horizontal layers to make a Yellow “bar” in the front face.
- Turn the front face so that the pair is in the right-hand side.
- Place the Yellow center pair in the top layer without messing up the White center using the following algorithm.

-
Use the middle layer to make the second Yellow “bar”.
-
Turn the top face and front face so that the 2 yellow bars are on the righthand side in the same column. Pair the bars up in the top layer using the following algorithm.

Possible problem: You may have three center pieces together . Perform the steps below to complete the Yellow center.

3. Solve the Green center

- Hold the cube so that the white center is still at the bottom and the yellow center is on top.
- As before you make a Green “bar” using the inner horizontal layers. Do not move the “vertical” inner layers as this will break your yellow and white centers.
- Turn the layer with the Green “bar” so that the bar is horizontal. This way you will not break it when making your second Green “bar”.

-
Turn the outer layers to orientate the 2 white bars correctly so that you can move them next to each other. Be sure not the break the white or yellow centers.

4. Solve the Orange center
Put the completed Green center at the bottom, with the Yellow center on the left and White center on the right. Make an Orange "bar" by moving two Orange pieces together, turning the face so the "bar" is vertical then restore the centers.
Repeat this to make second Orange bar this time with Green in the Back and the already completed Bar in the Bottom.

Then follow the instructions below to put the two orange bars together without messing up the completed centers.

Possible problem: You may have three center pieces together. Perform the steps below to make your Orange Center.


5. Solve the Red and Blue centers.
There are seven cases for solving the last two centers. In the pictures below the Top face should be Blue and the front face Red.


IMPORTANT: Check that your centers are correct.
- White opposite Yellow
- Blue opposite Green
- Red Opposite Orange.
- If White is on top and Blue is facing you, then Red must be on the left and Orange on the Right.
If your centers are not in the correct position then you can use the following algorithms to correct the centers.

PART 2: Pair the Edges
Pair all 12 edges
The second part of solving a 4x4 is to pair two edges with the same colours together. There are 12 edge pairs in total to make. The goal of this part is to reduce the 4x4 to a 3x3. So you can then solve it like a 3x3.

The Concept:

At the beginner level, you will move the edges that you want to pair into the front left and right slots. This will enable you to make and store the pair without disturbing the rest of the cube.
The secret of this step is to always bring an unpaired edge back into the front right slot so that solved pieces are not disturbed when you restore your centers after an edge pair.
a) Setup to pair edge
Choose two edges that you want to pair. The goal is to move two edges with the same colours into the front left and right spots by turning the outer layers ONLY.
IMPORTANT: Do not turn any inner layers for this step. This will break the centers you made in part 1.


b) Pair Edge and Store
The next step is to pair the edge. Make sure that you have an unpaired edge in the top layer as this will go into the paired edge slot. This step breaks the centers, but it will be restored once you moved the paired edge into the top layer.
1) Pair the edges
OR

2) Store the edge in the Top Face
Move the paired edge into the top face which brings an unpaired edge into the equator layers.

3) Restore the Center

c) Repeat Edge Pairing for 10 edges

Repeat the edge pair process. If you have no unpaired edges in the top layer then turn the cube around.
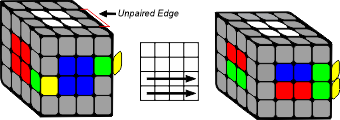
d) Last Edge Pair
For the past edge pair you will have two “unpaired edges” with the same two different pieces. For this step same edges need to be in the same horizontal layer on both sides. You will now perform the middle slice as if you were pairing the edges, then flip the edge and slice back to pair the edges. Note the pair will only be made with the last slice back move.
PART3: Solve using 3x3 method
Now that you have all your centers complete and edges paired you can solve the cube as you would a 3x3.
Possible Problem: Whilst solving the last layer of the 3x3 stage, you may come across a problem where it seems like a last layer edge is flipped, or only two edges are swapped, which is impossible on a 3x3. This is called parity.
The following pages show you how to solve the Parity:

3 comments
Dannielle Hale
I love how it says solve like a regular Rubik’s cube but it’s not that easy at all. I do 3×3 daily and couldn’t “solve like a regular Rubik’s cube”
austin
im not new to cubing but it did help me alot :)
Stephen
I’m fairly new to cubing so sometimes I have a hard time remembering the order of the colors. The trick I use is after making sure White is top and Yellow is bottom, I turn the cube so White is on the front. Then I check that the grass is on the bottom (Green), sky is on the top (Blue), R is for right and Red, and Orange is the only one left. It is a silly mnemonic device but it works for me.